SCCM Windows 7 – Zero Touch Installation incl. Bitlocker
SCCM Windows 7; Zero Touch Installation incl. Bitlocker
I searched myself crazy to get my Zero Touch Migration to Windows 7 with bitlocker on both drives working, therefore i’d like to share the steps with all of you.
Here’s how my working Task Sequence looks like:
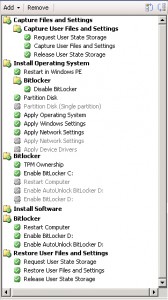
Steps:
1. Create partitions
You need at least 2 partitions to enabel Bitlocker, 1 boot partition (this wil NOT be bitlocked) and 1 for the OS. I created a 3rd partition for my Data.
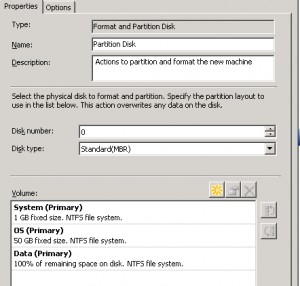
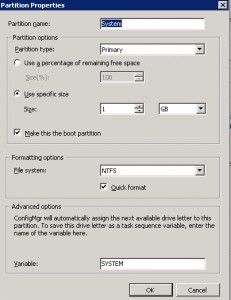
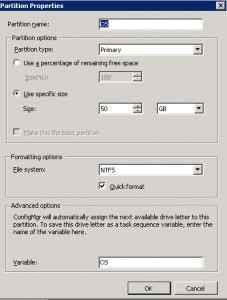
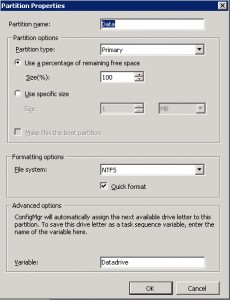
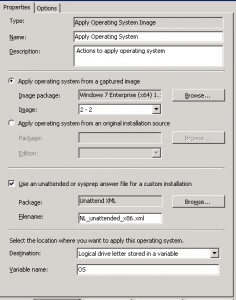
In the Apply Operating System you select Destination Logical drive letter stored in a variable (You create this in Step 1)
3. TPM Ownership
Before you can enable Bitlocker you need to take ownership of the TPM Chip, if the TPM Ownership is already set you can disable this step, if you don’t know you can reset the TPM Chip from the BIOS.
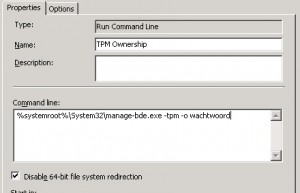
The Command Line** to set the ownership is %systemroot%\System32\manage-bde.exe -tpm -o password
“If you try to set the ownership and it is already set you will get an error and you’re TS will fail”
4. Enable Bitlocker C:
You can enable Bitlocker on the Boot partition with the default Step in SCCM, but I chose to do it with the Command Line so you can set extra Options like Encryption Methode and PIN
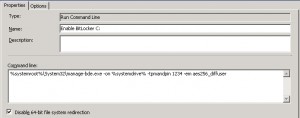
The Command Line** to enable Bitlocker on the Boot Partition is %systemroot%\System32\manage-bde.exe -on %systemdrive% -tpmandpin 1234 -em aes256_diffuser
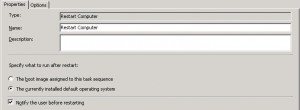
5. Restart Computer
To complete the Enable Bitlocker step you need to reboot the computer, as you can see in my Task Sequence I install all Software first, because after the reboot there will be alot of IO to encrypt the partition.
6. Enable Bitlocker D:
You cannot enable Bitlocker on fixed Drives with the default steps in SCCM
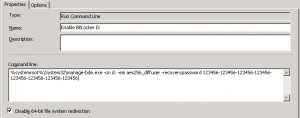
The Command Line** to enable Bitlocker on the Data Partition is %systemroot%\System32\manage-bde.exe -on d: -em aes256_diffuser -recoverypassword 123761-123761-123761-123761-123761-123673-123761-123761
In this example I used a specific recoverypassword so I can always unlock a Data partition if the OS fails to unlock it, if you only use the -recoverypassword option it will generate a key automatically and you can review and save this at a later time.
7. Autounlock D:
When you reboot your computer, you’re Data partition will be locked an can only be unlocked with the recovery key you used to enable Bitlocker on the Data partition. To automatically unlock the drive you can use this Command Line** : %systemroot%\System32\manage-bde.exe -autounlock -enable d:
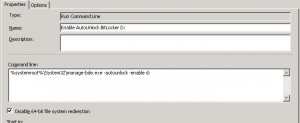
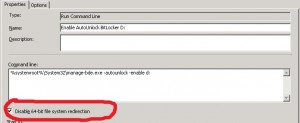
** On 64-bit OS’s you need to check the Disable 64-bit file system redirection checkbox else you’re command line will fail
Usefull Commands:
- Manage-bde : Is used to manage Bitlocker Drive Encryption
- Manage-bde -status : Will display the percentage of encryption and encryption methods
- Manage-bde -protectors -get driveletter : Will display the recoverypassword which is used on the driveletter specified
- Manage-bde -changepin : Can be use to change the Startup PIN
- Manage-bde -pause driveletter : Can be used to pause the encryption (Only neccessary when encryption is not complete)
- Manage-bde -resume driveletter : Can be used to resume the encryption
- Manage-bde -protectors -disable driveletter : Can be used to “temporary” disable bitlocker on a drive, for example you’de like to swap the HDD to another machine or you’d like to update the BIOS
- Manage-bde -protectors -enable driveletter : Can be used to enable bitlocker again.

Do you need to add the unlock command before the autounlock?
%systemroot%\system32\manage-bde.exe -unlock d: -recoverypassword 123761-123761-123761-123761-123761-123673-123761-123761
Yes you need to, before you can auto unlock a drive it needs te be unlocked first.